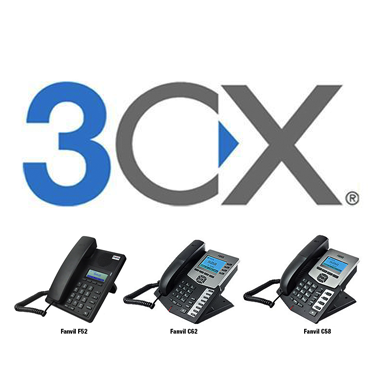
Auto Provisioning Fanvil C58P, C62P IP Phones for 3CX
Refer to: http://www.3cx.com/sip-phones/fanvil-c58-c62/
This guide shows you how to automatically provision the Fanvil F52, C58P, C62P IP phones for use with 3CX Phone System. 3CX Phone System 12 & 12.5 is required to provision the FanvilF52, C58P, C62P IP phones successfully. This guide has been tested with the latest firmware versions supported by 3CX Phone System 12 & 12.5.
The easiest way to set up Fanvil IP phones for use 3CX Phone System is to use the built-in plug and play provisioning functionality that’s provided for you inside the 3CX Management Console. By auto provisioning your Fanvil phone configures itself by retrieving a 3CX-generated phone configuration file. If you prefer configuring your phone using the DHCP and option 66, check out this DHCP Option 66 Configuration guide.
Step 1: Verify the Firmware on Your Fanvil F52, C58P, C62P IP phones
Important Note: Supported firmware version is v.2.3.431.247.
You’ll need to verify that the firmware version that’s currently installed on your Fanvil phone is v.2.3.431.247. To check which firmware is installed on your Fanvil phone, power up the phone and press “Menu” > “Status” and scroll down to“Firmware” so that you can see the version. 3CX Phone System users that have 3CX Maintenance Agreement can update their Fanvil firmware from within 3CX Phone System by logging into the 3CX Management Console. To do this, visit the Phones node and select your Fanvil phone and click on the “Upgrade Firmware” button. If you’re using an older, outdated version of 3CX Phone System, visit the Fanvil Support page and download the latest firmware for your Fanvil phone.
It might be required to factory reset your phone after a firmware update to ensure that any previous configuration is erased.
Step 2A: Provisioning a FanvilF52, C58P, C62P IP Phones Using Plug and Play
To begin Plug and Play provisioning plug your Fanvil IP Phone into the same LAN subnet as the PBX and power it up. Make sure you’ve plugged your phone into the same LAN subnet as the machine that has 3CX installed on it (3CX Phone System must run on port 5060) and that the phone has been reset to factory settings. If you are trying to provision an extension in a remote network (WAN) in a different subnet, or on a PBX whose default port is not 5060 please skip this step and see Step 2B.

Now you need to approve the Fanvil’s registration and assign an extension to it. It’s really easy to do. Simply follow these steps:
- Click on the “Phones” node within the 3CX Management Console.
- When you’ve plugged in your Fanvil phone, you will see it appear at the top of the list in bold.
- Right click on phone and select one of the available options:
- Add Extension – This will create a new extension and assign it to the specific phone.
- Assign to Existing Extension – This will assign an existing extension to the specific phone.
- Assign or create an extension and click “OK”.
- You will be taken to the Extensions settings page.
- To configure BLF function keys or speed dials in the ‘Phone Provisioning’ tab see the Optional Step at the end of this guide.
- Click “OK”.
3CX Phone System will send a provisioning link to your Fanvil phone. Once your phone receives the link, it will download the configuration file and reboot itself . Once the phone is rebooted it will be ready to use.
Step 2B: Provisioning a Fanvil F52, C58P, C62P Using a Provisioning Link
- Log in to your 3CX Management Console.
- Go to the extensions node and create or select the extension that you want to assign to your Fanvil IP Phone.
- Click on the Phone provisioning tab and fill in your phone’s MAC Address. You can find the Mac Address of your Fanvil phone by turning the phone over and looking at the MAC sticker on the back. Select a Model from the drop down list according to the one you are configuring.
- Select your display language.
- If you are provisioning an extension in a remote network, make sure that the “Select Provisioning Method”is set to“Remote Extension (STUN)”. When choosing this option, you also need to uncheck the “Disallow use of extension outside the LAN” option in the “Options” tab. If you are provisioning an extension in another subnet select “Local Lan”.
- If you want to change your Codec Priority or configure BLFs please see the Optional Step at the end of this Guide. Click “OK” when you have selected your desired settings to save them.
- Click on the Settings tab and select the Phone Provisioning tab. Copy the External Provisioning URL (or the Internal one if you are provisioning an extension in a local subnet) as that will be used in the next step.
This procedure will create a provisioning file for your Fanvil IP Phone. The next step will be to instruct the phone to retrieve that file.
Getting your Remote Fanvil IP Phone to Register with 3CX
- Start up your Fanvil IP phone and identify its IP address. To find your phone’s IP address, simply press the OK key on the phone and then select Status. In this example we’re going to assume that the IP address of your Fanvil phone is 10.172.0.208 and the External IP address of the server (or PC) where 3CX Phone System is installed is 3.3.3.3.
- Point your browser to the web interface of your Fanvil series phone, which in this example is 10.172.0.208 .
- You will be logged into your Fanvil ’s web interface.
- Select “Maintenance” from the menu on the left. In the “Auto Provision” tab and click on the “Phone Flash Settings”section to expand it.
- Paste the link that you copied in step 7 of Part 2B into the “Server Address” field as shown above select inProtocol Type “HTTP” and in Update Mode select “Update After Reboot”.
- Click “Apply”, switch to the “Reboot” tab and reboot your phone. Note that it might take a couple of minutes before your Fanvil Phone retrieves the necessary files and applies the configuration
Optional Step- Configure BLF Function Keys on Your FanvilF52, C58P, C62P IP Phone
The Fanvil phones have function keys that can be provisioned through the 3CX Plug and Play feature. This can be done in the 3CX Management Console from the “Phone Provisioning” tab, in the extension settings.

- In the Edit Extension page, navigate to the “Phone Provisioning” tab.
- Select Codec Priority, BLF function keys, Shared Parking and other various types of Speed Dials.
- Click “OK”.
To apply this new configuration you will need to re-provision your Fanvil IP Phone. Go to the “Phones” node in the 3CX Management Console, select your phone and click “Reprovision Phones” from the top row of buttons.
 Previous Post